I have been playing with Chat GPT and I saw on Reddit that someone had the idea to ask it to write an ode to Clojure.
I tried it a few times as well and here is my favourite version:
Oh Clojure, a language so elegant and fine,
With your concision and power, you blow the mind.
Your Lisp roots run deep, and your functional core
Makes coding a joy, and never a bore.
Your homoiconicity is a thing of beauty,
Allowing code and data to flow with ease and duty.
Your interoperability with Java is a sight to see,
Allowing us to use the best of both worlds, merrily.
Your REPL is a treasure, allowing us to explore,
And test our code in a way that we adore.
Oh Clojure, you are a true work of art,
A language that is loved by many a heart.
Here’s to you, dear Clojure, may you continue to shine,
A beacon of simplicity, power, and design.
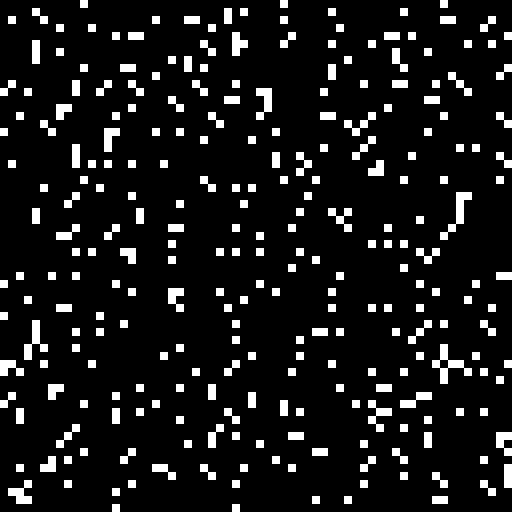
Initially a binary pattern BP is created where N pixels (about 10 percent) are set to 1 and the rest to 0.
The binary pattern then is convolved with the following filter function to generate the density array DA:
\[
\displaystyle f(x, y) = e ^ {-\frac{x^2+y^2}{2\sigma^2}}
\]
You can use a sigma value of 1.5.
The convolution is wrapped around to facilitate a tileable result:
\[
\displaystyle DA(x, y) = \sum_{p=-M/2}^{M/2} \sum_{q=-M/2}^{M/2} BP((x-p)\ mod\ M, (y-q)\ mod\ M) f(p, q)
\]
Maxima of the density array are called clusters and minima are called voids.
The 1 value in BP with the highest density value DA (tightest cluster) is set to 0 and DA is updated accordingly.
Now the 0 value in BP with the lowest density value DA (largest void) is set to 1 (and DA is updated).
This is repeated until disolving the tightest cluster creates the largest void.
This is done to spread the 1 values evenly.
Phase 1
In phase 1 of the dithering algorithm the 1 values of a copy of the seed pattern are removed one by one starting where the density DA is the highest.
A copy of the density array DA is updated accordingly.
The corresponding positions in the resulting dither array are set to N-1, N-2, …, 0.
Phase 2
In phase 2 starting with the seed pattern a mask is filled with 1 values where the density DA is the lowest.
The density array DA is updated while filling in 1 values.
Phase 2 stops when half of the values in the mask are 1.
The corresponding positions in the dither array are set to N, N+1, …, (M * M) / 2 - 1
Phase 3
In phase 3 the density array DA is recomputed using the boolean negated mask from the previous phase (0 becomes 1 and 1 becomes 0).
Now the mask is filled with 1 values where the density DA is the highest (clusters of 0s) always updating DA.
Phase 3 stops when all the values in the mask are 1.
The corresponding positions in the dither array are set to (M * M) / 2, …, M * M - 1.
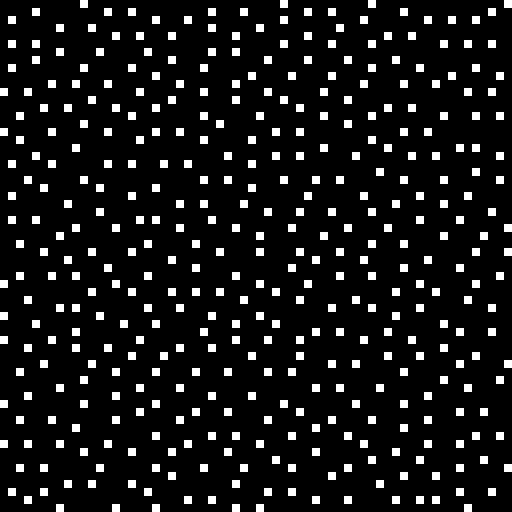
Result
The result can be normalised to 0 to 255 in order to inspect it.
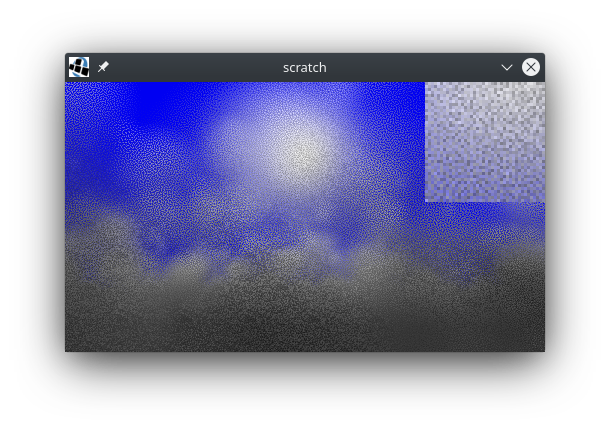
The blue noise dither array looks as follows:
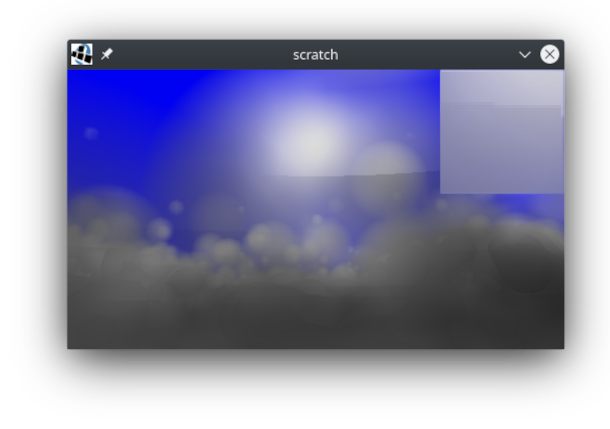
Here is an example with constant offsets when sampling 3D clouds without dithering.
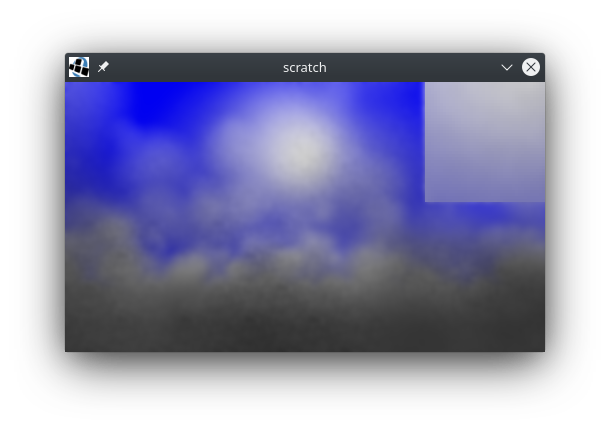
Here is the same scene using dithering to set the sampling offsets.
One can apply a blur filter to reduce the noise.
Note how the blurred image shows more detail than the image with constant offsets even though the sampling rate is the same.
Let me know any comments/suggestions in the comments below.
Test driven development (TDD) undoubtedly helps a great deal in preventing development grinding to a halt once a project’s size surpasses a few lines of code.
The reason for first writing a failing test is to ensure that the test is actually failing and testing the next code change.
A minimal change to the code is performed to pass the new test while also still passing all previously written tests.
If necessary the code is refactored/simplified. The reason to do this after passing the test is so that one does not have to worry about passing the test and writing clean code at the same time.
Testing rendering output
One can test OpenGL programs by rendering test images and comparing them with a saved image (a test fixture).
In order to automate this, one can perform offscreen rendering and do a pixel-wise image comparison with the saved image.
Using the Clojure programming language and the Lightweight Java Game Library (LWJGL) one can perform offscreen rendering with a Pbuffer object using the following macro (of course this approach is not limited to Clojure and LWJGL):
; Set up OpenGL modes(defnsetup-rendering"Common code for setting up rendering"[widthheight](GL11/glViewport00widthheight)(GL11/glEnableGL11/GL_DEPTH_TEST)(GL11/glEnableGL11/GL_CULL_FACE)(GL11/glCullFaceGL11/GL_BACK)(GL11/glDepthFuncGL11/GL_GEQUAL)(GL45/glClipControlGL20/GL_LOWER_LEFTGL45/GL_ZERO_TO_ONE)); Macro accepting a block of code to be rendered to a Pbuffer(defmacrooffscreen-render"Macro to use a pbuffer for offscreen rendering"[widthheight&body]`(let[pixels#(BufferUtils/createIntBuffer(*~width~height))pbuffer#(Pbuffer.~width~height(PixelFormat.2482400)nilnil)data#(int-array(*~width~height))](.makeCurrentpbuffer#)(setup-rendering~width~height)(try~@body(GL11/glReadPixels00~width~heightGL12/GL_BGRAGL11/GL_UNSIGNED_BYTEpixels#)(.getpixels#data#){:width~width:height~height:datadata#}(finally(.releaseContextpbuffer#)(.destroypbuffer#)))))
Using the Midje testing library one can for example test a command for clearing the color buffer as follows:
; Test rendering a red background(fact"Render background color"(offscreen-render160120(clear(matrix[1.00.00.0])))=>(is-image"test/sfsim25/fixtures/render/red.png"))
; Implement equality test for RGBA images ignoring alpha channel.(defnis-image"Compare RGB components of image and ignore alpha values."[filename](fn[other](let[img(slurp-imagefilename)](and(=(:widthimg)(:widthother))(=(:heightimg)(:heightother))(=(map#(bit-and%0x00ffffff)(:dataimg))(map#(bit-and%0x00ffffff)(:dataother))))))); Load an RGB image(defnslurp-image"Load an RGB image"[^Stringfile-name](let[img(.openImage(Opener.)file-name)](.convertToRGB(ImageConverter.img)){:width(.getWidthimg):height(.getHeightimg):data(.getPixels(.getProcessorimg))}))
The image is recorded initially by using the checker record-image instead of is-image and verifying the result manually.
; Test method writing image to file instead of comparing it.(defnrecord-image"Use this test function to record the image the first time."[filename](fn[other](spit-imagefilenameother))); Method to save image.(defnspit-image"Save RGB image as PNG file"[^Stringfile-name{:keys[widthheightdata]}](let[processor(ColorProcessor.widthheightdata)img(ImagePlus.)](.setProcessorimgprocessor)(.saveAsPng(FileSaver.img)file-name)))
One can use this approach (and maybe only this approach) to test code for handling vertex array objects, textures, and for loading shaders.
Testing shader code
Above approach has the drawback that it can only test complete rendering programs.
Also the output is limited to 24-bit RGB images.
The tests are therefore more like integration tests and they are not suitable for unit testing shader functions.
However it is possible to use a Pbuffer just as a rendering context and perform rendering to a floating-point texture.
One can use a texture with a single pixel as a framebuffer.
A single pixel of a uniformly colored quad is drawn.
The floating point channels of the texture’s RGB pixel then can be compared with the expected value.
; Use shaders to render to a single pixel texture and read out result.(defnshader-test[setupprobe&shaders](fn[uniformsargs](let[result(promise)](offscreen-render11(let[indices[0132]vertices[-1.0-1.00.5,1.0-1.00.5,-1.01.00.5,1.01.00.5]program(make-program:vertex[vertex-passthrough]:fragment(conjshaders(applyprobeargs)))vao(make-vertex-array-objectprogramindicesvertices[:point3])tex(texture-render11true(use-programprogram)(applysetupprogramuniforms)(render-quadsvao))img(texture->vectorstex11)](deliverresult(get-vectorimg00))(destroy-texturetex)(destroy-vertex-array-objectvao)(destroy-programprogram)))@result))); Minimal vertex shader.(defvertex-passthrough"#version 410 core
in highp vec3 point;
void main()
{
gl_Position = vec4(point, 1);
}"); Macro to render output of a code block to a texture.(defmacrotexture-render"Macro to render to a texture"[widthheightfloating-point&body]`(let[fbo#(GL45/glCreateFramebuffers)tex#(GL11/glGenTextures)](try(GL30/glBindFramebufferGL30/GL_FRAMEBUFFERfbo#)(GL11/glBindTextureGL11/GL_TEXTURE_2Dtex#)(GL42/glTexStorage2DGL11/GL_TEXTURE_2D1(if~floating-pointGL30/GL_RGB32FGL11/GL_RGBA8)~width~height)(GL32/glFramebufferTextureGL30/GL_FRAMEBUFFERGL30/GL_COLOR_ATTACHMENT0tex#0)(GL20/glDrawBuffers(make-int-buffer(int-array[GL30/GL_COLOR_ATTACHMENT0])))(GL11/glViewport00~width~height)~@body{:texturetex#:targetGL11/GL_TEXTURE_2D}(finally(GL30/glBindFramebufferGL30/GL_FRAMEBUFFER0)(GL30/glDeleteFramebuffersfbo#))))); Read out texture and return floating point RGB image.(defntexture->vectors"Extract floating-point vectors from texture"[texturewidthheight](with-2d-texture(:texturetexture)(let[buf(BufferUtils/createFloatBuffer(*widthheight3))data(float-array(*widthheight3))](GL11/glGetTexImageGL11/GL_TEXTURE_2D0GL12/GL_BGRGL11/GL_FLOATbuf)(.getbufdata){:widthwidth:heightheight:datadata})))
Furthermore it is possible to compose the fragment shader by linking the shader function under test with a main function.
I.e. it is possible to link the shader function under test with a main function implemented just for probing the shader.
The shader-test function defines a test function using the probing shader and the shader under test.
The new test function then can be used using the Midje tabular environment.
In the following example the GLSL function phase is tested.
Note that parameters in the probing shaders are set using the weavejester/comb templating library.
; Probing shader generated using templating.(defphase-probe(template/fn[gmu]"#version 410 core
out lowp vec3 fragColor;
float phase(float g, float mu);
void main()
{
float result = phase(<%= g %>, <%= mu %>);
fragColor = vec3(result, 0, 0);
}")); Use shader test function and probing shader to test a shadder.(defphase-test(shader-test(fn[program])phase-probephase-function)); Midje tests using test function to test a shader.(tabular"Shader function for scattering phase function"(fact(mget(phase-test[][?g?mu])0)=>(roughly?result))?g?mu?result00(/3(*16PI))01(/6(*16PI))0-1(/6(*16PI))0.50(/(*30.75)(*8PI2.25(pow1.251.5)))0.51(/(*60.75)(*8PI2.25(pow0.251.5))))
Note that using mget the red channel of the pixel is extracted.
Sometimes it might be more desirable to check all channels of the RGB pixel.
Here is the actual implementation of the tested function:
The empty function (fn [program]) is specified as a setup function.
In general the setup function is used to initialise uniforms used in the shader under test.
Here is an example of tests using uniform values:
; Probing shader generated using templating.(deftransmittance-track-probe(template/fn[pxpypzqxqyqz]"#version 410 core
out lowp vec3 fragColor;
vec3 transmittance_track(vec3 p, vec3 q);
void main()
{
vec3 p = vec3(<%= px %>, <%= py %>, <%= pz %>);
vec3 q = vec3(<%= qx %>, <%= qy %>, <%= qz %>);
fragColor = transmittance_track(p, q);
}")); Shader test involving some uniform variables.(deftransmittance-track-test(transmittance-shader-test(fn[programheight-sizeelevation-sizeelevation-powerradiusmax-height](uniform-intprogram:height_sizeheight-size)(uniform-intprogram:elevation_sizeelevation-size)(uniform-floatprogram:elevation_powerelevation-power)(uniform-floatprogram:radiusradius)(uniform-floatprogram:max_heightmax-height))transmittance-track-probetransmittance-trackshaders/transmittance-forwardshaders/horizon-angleshaders/elevation-to-indexshaders/interpolate-2dshaders/convert-2d-indexshaders/is-above-horizon)); Midje tests to test a shader.(tabular"Shader function to compute transmittance between two points in the atmosphere"(fact(mget(transmittance-track-test[171716378000.0100000.0][?px?py?pz?qx?qy?qz])0)=>(roughly?result1e-6))?px?py?pz?qx?qy?qz?result00647800000647800010064280000064780000.50064530000064780000.75006428000006453000(/0.50.75))
Here a setup function initialising 5 uniform values is specified.
Mocking shader functions
If each shader function is implemented as a separate string (loaded from a separate file), one can easily link with mock functions when testing shaders.
Here is an example of a probing shader which also contains mocks to allow the shader to be unit tested in isolation:
Rhawk187 pointed out that exact image comparisons are also problematic because updates to graphics drivers can cause subtle changes. This can be adressed by allowing a small average difference between the expected and actual image.
In order to be independent of the graphics driver one can run the tests using xvfb-run to use software rendering instead.
The code of make-vertex-array-object and render-quads is added here for reference.
(defnmake-vertex-array-object"Create vertex array object and vertex buffer objects"[programindicesverticesattributes](let[vertex-array-object(GL30/glGenVertexArrays)](GL30/glBindVertexArrayvertex-array-object)(let[array-buffer(GL15/glGenBuffers)index-buffer(GL15/glGenBuffers)](GL15/glBindBufferGL15/GL_ARRAY_BUFFERarray-buffer)(GL15/glBufferDataGL15/GL_ARRAY_BUFFER(make-float-buffer(float-arrayvertices))GL15/GL_STATIC_DRAW)(GL15/glBindBufferGL15/GL_ELEMENT_ARRAY_BUFFERindex-buffer)(GL15/glBufferDataGL15/GL_ELEMENT_ARRAY_BUFFER(make-int-buffer(int-arrayindices))GL15/GL_STATIC_DRAW)(let[attribute-pairs(partition2attributes)sizes(mapsecondattribute-pairs)stride(apply+sizes)offsets(reductions+(cons0(butlastsizes)))](doseq[[i[attributesize]offset](maplist(range)attribute-pairsoffsets)](GL20/glVertexAttribPointer(GL20/glGetAttribLocation^intprogram(nameattribute))^intsizeGL11/GL_FLOATfalse^int(*strideFloat/BYTES)^int(*offsetFloat/BYTES))(GL20/glEnableVertexAttribArrayi)){:vertex-array-objectvertex-array-object:array-bufferarray-buffer:index-bufferindex-buffer:nrows(countindices):ncols(countattribute-pairs)}))))(defnrender-quads"Render one or more quads"[vertex-array-object](setup-vertex-array-objectvertex-array-object)(GL11/glDrawElementsGL11/GL_QUADS^int(:nrowsvertex-array-object)GL11/GL_UNSIGNED_INT0))
It is recommended when choosing the RAM to use a multi-channel configuration for better performance.
Also make sure to order enough RAM because some of it is used by the integrated graphics card.
Finally doing parallelized builds on many cores requires more memory.
Here is an in-depth review in German language (and here is a shorter review).
Also there is a Youtube video review in English below:
Installing Debian 11
On Reddit I got helpful information from Ferdinand from Tuxedo Computers on how to install Debian 11 on the Aura 15 Gen1.
Also see Debian Wiki for some information.
Debian is not supported by Tuxedo Computers but it works nonetheless on a Tuxedo Aura 15 Gen1.
I followed the following steps (no warranty) to get Debian 11 running:
I installed plasma-browser-integration and the corresponding browser addon (available for Firefox and Chrome/Chromium)
I installed ffmpegthumbs and kdegraphics-thumbnailers and then enabled the thumbnail generators in the Dolphin settings
I installed bleachbit and run it to clean up unused disk space
Finally you can list the installed packages on an old system to install them on the new machine.
I.e. you can run the following command on the old machine:
Sometime ago I discovered the AXM Paper Space Scale Models website.
On the website Alfonso X Moreno published various paper scale models of the Space Shuttle, the ISS, the Tiangong, SpaceX Starship, and others.
I downloaded the SpaceX Crew Dragon paper model and I donated a bit of money for it.
I used pdftk to split the PDF document into single- and double-sided jobs.
Then I used doxdirect.com to get it printed, because they offer printing on 160gsm paper (normal office paper is only 80gsm and is not strong enough).
I couldn’t find instructions on the website on how to build the docking version of the paper model.
Finally I found an instructional video on Youtube:
Here is the finished Crew Dragon capsule (I will do the service module later).
I can really recommend to check out AXM’s website if you are into paper models.